CS502
Project 7: Garbage Collection
Due 11:59pm Sunday Dec 7
Download the skeleton code for the project here.
Introduction
ASM Lowering and Virtual Machine
The skeleton code you are given for this assignment contains two elements:
- The compiler, with reference implementations of the phases so far
(but no Optimizer), a CPS register allocator and a CPS to assembly
language transformer in
compiler/src/miniscala/CPSToASMTranslator.scala; - A virtual machine for executing the assembly code, in the
vmdirectory.
The virtual machine contains two main components:
- The interpreter, located in
vm/src/engine.c(and with the header filevm/src/engine.h); - The memory system, implemented in
vm/src/memory_nofree.candvm/src/memory_mark_n_sweep.c(and with the header filevm/src/memory.h).
The virtual machine also contains basic infrastructure like a makefile and 4 tests you can use to check your GC implementation.
Getting Started
To start, unpack the skeleton code as you have done for the last
assignments. Now, you will have the vm directory. Go there and
run make:
$ cd vm/
$ make
Use the following targets:
 - 'make vm' to use your mark-sweep GC
 - 'make test' to test the VM
 - 'make clean' to clean the VM
$ make test
rm -rf bin
mkdir -p bin
cc -std=c99 -g -Wall -O3  src/engine.c src/fail.c src/loader.c src/main.c src/memory.c -o bin/vm
Queens test failed!
Bignums test failed!
Pascal test failed!
Maze test failed!
You can also run the tests individually, since they’re included in
examples:
$ bin/vm ../examples/asm/queens.asm
enter size (0 to exit)> 10
Error: no memory left (block of size 2 requested)
Your task is simple: make the tests pass by implementing a mark and
sweep garbage collector instead of the no-GC memory system currently
implemented in vm/src/memory_nofree.c. In order to test the vm
with your garbage collector, you will need to change the value of the
variable GC_VERSION in the file memory.h.
Okay, that’s it with the intro. Now for real work.
The Memory
We first breifly describe how the VM engine interacts with the memory
manager and subsequently detail the implementation that is required for
this assignement. When the virtual machine is started, the first call
is to memory_setup. This allows the memory manager to allocate the
total memory (the amount can be changed using the -m <size> command
line option of the vm). The “total_size” parameter passed to this
method indicates the total number of bytes needed (the default value
is 1000000). The method memory_get_start returns a pointer to the
beginning of this allocated memory. The total memory is used to store
the program code and the heap.
The virtual machine then loads the program code into the memory.
Afterwards, the method memory_set_heap_start is called, indicating the
first address that directly follows the program code. The memory
starting from this address can be used by the memory manager to store
its data structures and for allocating blocks in the heap:
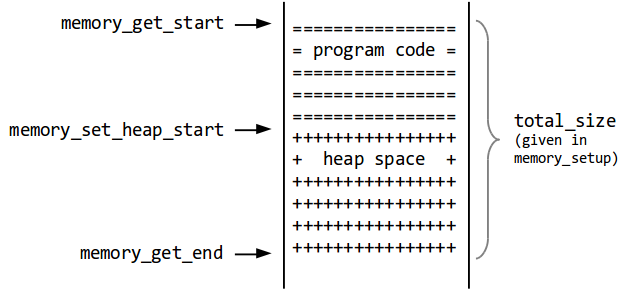
The function memory_allocate is invoked when a heap block needs to be
allocated.
Virtual and Physical Addresses
- The memory can be seen as an array of 32-bit values referred to as
words, which is represented by the type
value_tin the VM. Every entry in the array can contain arbitrary 32 bit information: tagged values, virtual addresses (explained below), block headers or registers (which are also stored in the heap) - There are two kinds of addresses in the VM:
- Physical addresses, represented as values of type
value_t*, are pointers to the elements of the memory array. - Virtual addresses, represented as values of type
value_t, are relative to the starting (physical) address of the memory and only point to individual words, so their last two bits are always 0. This satisfies the tagging requirement for references, which states that they should end in bits 00;
- Physical addresses, represented as values of type
- The pointers stored in the heap are always virtual addresses. The
addr_v_to_pandaddr_p_to_vmethods in the fileengine.cconvert between the two address types. - While physical addresses are addresses of words in the memory, virtual addresses are virtual machine pointers. It is essential that addresses stored in the heap are virtual addresses and not physical addresses (i.e, pointers to the elements of the memory array)!
- For efficiency reasons, the pointers stored in the base registers
(result of
engine_get_base_register) are physical addresses. - The size parameter passed to the
memory_allocatefunction is numbers of words that have to be allocated.
The Garbage Collector
You are required to write a memory manager that implements the interfaces defined in the “memory.h” file and performs mark-sweep garbage collection. Below we provide an overview of the data structures that have to be implemented and also a few tips and tricks.
Block Headers
As discussed in the lectures, memory is allocated and freed in chucks of words referred to as blocks. Each block has a tag and a size which are passed as parameters to the “block-alloc” primitive. We refer to the starting address of a block as a “block pointer”. Use the first word of a block to store the tag and size of the block (which are referred to as block headers). Therefore, to allocate a block of size n you will need n+1 words.
Free list
You GC must have a (singly-linked) free list containing all the free blocks. The second word of a free block can be used to store the address of the next element of the free list.
There is a slight trick with free lists. A free list entry contains at least 2 words. But the library allocates blocks of size 0 (and thus 1 word) that your GC can later free. This produces 1-word entries in the free list, which won’t work. To overcome this, the easiest solution is to allocated at least two words, even for blocks of size 0.
The free list is used to allocate blocks. When having multiple free list entries, you should either pick the smallest one that fits the necessary size (best fit strategy) or the first one that fits (first fit strategy).
Segregated free lists
Instead of having a single free list, it is much more efficient to have several free lists, one per block size up to a maximum block size, plus one free list for the bigger blocks. That way, in many cases, no iteration is necessary to find a free block of a given size.
We suggest you write a first version of your GC with a single free list, and once it works, you update it to have 32 segregated free lists. As described below, only a GC using segregated free lists could get you the maximum number of points for this assignment.
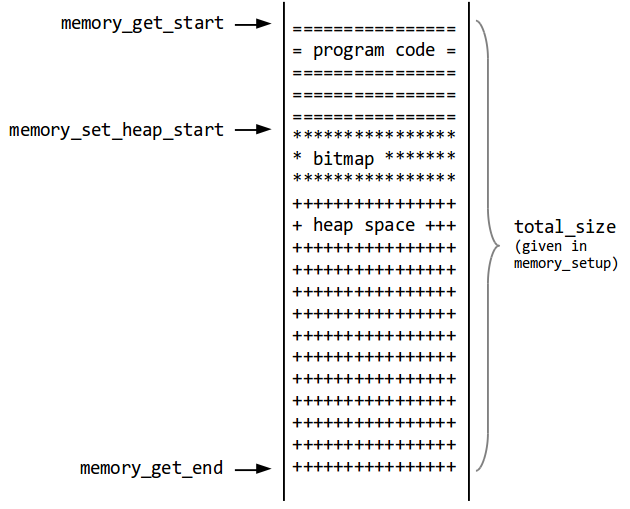
Pointer Bitmap
You need to maintain a bitmap with one bit per valid heap address. This bitmap is used for two purposes:
-
to determine if a value stored in the heap is a valid block pointer. Even though we use tagged values, it is possible that, during an arithmetic operation, an untagged value is left in one of the registers. Since the registers of our virtual machine are also stored in the heap, we may mistake an untagged value for a virtual address in the marking phase. So although it looks like a virtual address, the untagged value may point anywhere, including invalid locations and in the middle of blocks. In order to prevent the GC from following incorrect addresses, we mark the beginning of each block in the bitmap.
-
during marking, we reset the bit to mark a block; therefore, at the end of the marking phase, the marked blocks will be those whose bit is not set in the bitmap. During the sweeping phase, you will also have to coalesce successive entries in the free list, so the heap memory does not get too fragmented. Also don’t forget to update the bitmap so that allocated blocks have their bit set, and free blocks have their bit cleared.
To complete the above picture, the memory layout would actually look like this:
Testing
You can either use the make test command to execute the tests
automatically, or you can run each individual test by hand (good for
debugging):
$ bin/vm ../examples/asm/queens.asm
enter size (0 to exit)> 10
Error: no memory left (block of size 16 requested)
The expected sizes your program should run on are:
- for queens.asm: without GC - breaks at 8, GC works with 15
- for bignums.asm: without GC - breaks at 214, GC works with 1000
- for pascal.asm: without GC - breaks at 57, GC works with 200
- for maze.asm: without GC - breaks at 7, GC works with 20
The test given to you do not check for the correctness of the output, it only check that the program run without Out Of Memory errors.
If you want to test simpler program, you can compile them with the
compiler first: sbt "run file.scala". It will generate the file
out.asm in the compiler folder. You can then run the vm on it.
Debugging
When debugging you may want to trigger a garbage collection early on. To
do so, print the code size and adjust the memory with
bin/vm -m <bytes> such that the size is just above the code size +
twice the bitmap size. This will let you trigger the garbage collection
early, when the program hasn’t yet allocated too much space, allowing
easier debugging.
Implement a procedure to check the data strcuture invariants
For ease of debugging, it is recommended that you implement a procedure that traverses every block in the heap and checks for the correctness of the headers and the freelist. To traverse all blocks in the heap you can start from the first block and use the block size (stored in the header) to jump to the start of the next block and so on. Also, use “assert”s (defined in assert.h header file) in all places in the code where you think an invariant must hold. This will greatly help in debugging. Of couse, this is only recommended and not mandatory.
The assignment will be evaluated based on the correctness of the implementation, its memory efficiency and execution time.
Grading
Here are several points to keep in mind:
- You are not allowed to use malloc within the vm. The heap has been allocated once, and all GC data structure needed must used this pre-allocated space.
- If your GC has a single free list, you will be able to get 100% of the points; to get to 120%, you need to have segregated free lists; however, don’t forget that a working GC with a single free list is better than a crashing one with segregated free lists!
- Neither of the examples should take more than 1s to run (best running times are in the order of hundreds of miliseconds)
- We may test your assignment through valgrind or address
sanitizer, so you should be very careful about the way you allocate,
access and free memory (you
canshould also run your assignment through valgrind/with address sanitizer on your own) - We will use the reference Makefile to compile and test your GC: please make sure that “make test” runs correctly on your machine and if there are additional flags necessary, remind us in the “memory_mark_n_sweep.c” file.
- We encourage you to write code that compiles across platforms. This includes avoiding any cast from a pointer X* to a value or integer type (value_t, int, long int, unit, size_t …). It is safe to cast form one pointer type to another (X* to Y, such as from (void) to (char) or (value_t)).
These criteria can influence your grade, so please take them into account!
You should write 5 meaningful tests. These 5 tests will be worth 5% of your grade. For extra credit you may write up to an additional 5 tests, worth 1% bonus each. Please name your test files test1.scala, test2.scala, ... and place them in the examples folder.
Turnin
You should turn in the proj7 directory. Please run an ‘sbt clean’ and ‘./cleanall.sh’ before submitting.
To turn in your project create a ZIP file named
proj<N>.zip of the proj7 directory for
example proj7.zip and upload it to the corresponding
assignment on Brightspace.